Birch Bark Box Tutorial
I've been meaning to do a post like this one for awhile. I've been resistant because of all the photos needed to do it right. This post will have more photos than I have ever put into a post to date. With the cold weather here, this whole week we've seen night time temps at -5f/-20c to -15f/-26c, it seems appropriate to sip some wine and write.
Having the benefit of being able, as the author to proof read this, it seems to have turned into an epic story on how to make boxes. Bear with the long winded story if its not your thing. Folks that know me know that at times I can go on and on.....this is one of those times. My story with these boxes are connected to some serious milestones in my journey as hand craftsman.
I've been making these boxes since 2001. The first one I saw was brought back from Norway with a friend who had spent the summer there. This was around the same time I was getting out of building timber frames and general carpentry and working hard at being a hand craftsman and teaching handcraft full time. So this box was of great interest. I don't think we had Internet then so I just tried my best to figure it out. Today we can search all kinds of interesting things on the web and learn so much. Back then I wasn't plugged in, I was alone in my search.
I made a bunch over a few years then got my hands on a book that the North House Folk School put out titled Celebrating Birch (
). It's a great book on all kinds of handcraft. In it Fred Livesay (now a good friend) describes making one. This was a great help and it was the first written explanation I had seen. I went further and found a few copies of some out of print books by different Swedish crafts folks. I continued to explore and learn.
A few years ago I had the chance to learn from one of the few masters of this style of box, Swedish craftsman Ramon Persson while he was teaching some classes at North House. You should check out his site
. I learned a lot from him, as master craft instructor but also his production mindset. Ramon explained that he would spend months making these boxes. Because of that process he learned new ideas and designs because of the continuum within the process. An example of this is carving 100 handles back to back. Any ideas you get while carving one can be put to the test on the next one and so on.
This was a pivotal time for me as I was wrestling with being an "artist" or "craftsmen". I thought that as an "artist" I was supposed to feel inspired to create the objects I was making. There were days were if I didn't feel like it then I wouldn't make anything. This is what I call the "artist trap". I had no idea that as a "craftsman" I could just go to work...enjoy the process, but make "craft objects" with passion, but not necessary inspiration. Sometimes creating nothing innovative, but making the same thing over and over. I believe was the way it was back in the day. Bowl turners having to turn 1000's of bowls to make money to feed the family with no time to fuss over "inspiration". Yes they got to decorate and do one offs...they were all one offs! That was the nature of handcraft and small scale production in the time before industrialization. Mind blowing stuff for me really.
The whole time I was exploring the bark boxes I was also learning to build birch bark canoes and making a lot of folded birch bark baskets. Through all this, Birch and it's bark has found an important place in my heart. A feeling that runs very deep.
When I teach and talk about natural materials I sometimes describe working with the bark and wood as a conversation. I believe it is, if we give the materials a place in our minds as a living being, to show us things, to teach us, it's a can be a very lively conversation. OK...OK...enough of the mystical/philosophical stuff....
I left out a bunch of steps that I thought would be redundant. You should be able to make one of these but as a teacher I encourage getting into the process and having fun as you learn. I'm not going to give you all of it, you have to learn it for yourself and mistakes and missteps are part of that. I've messed up plenty of these over the years.
If you are going to try this, practice on a piece of paper for a few times. You can avoid mistake with the bark and get your head wrapped around the way the mortises work. Have fun.

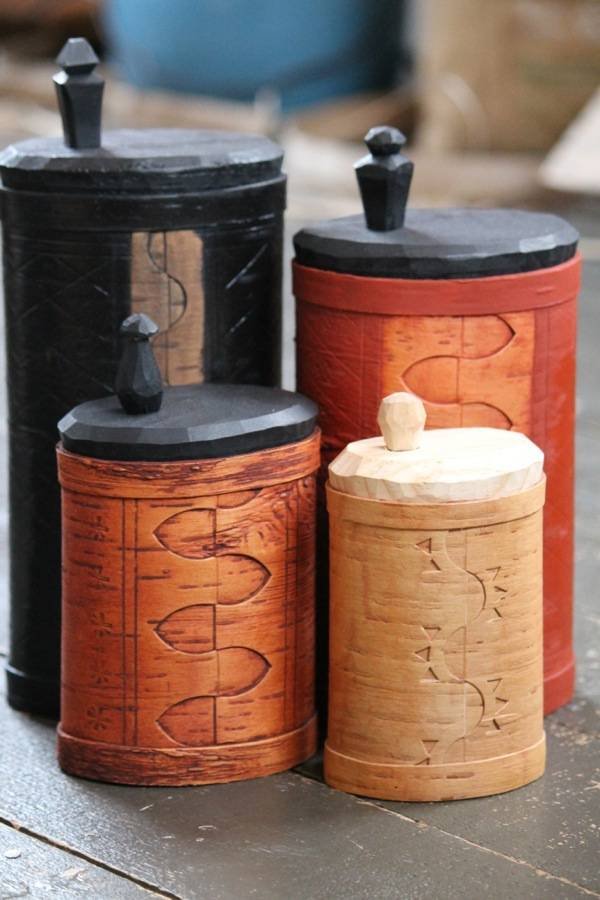
finished boxes, plain or painted
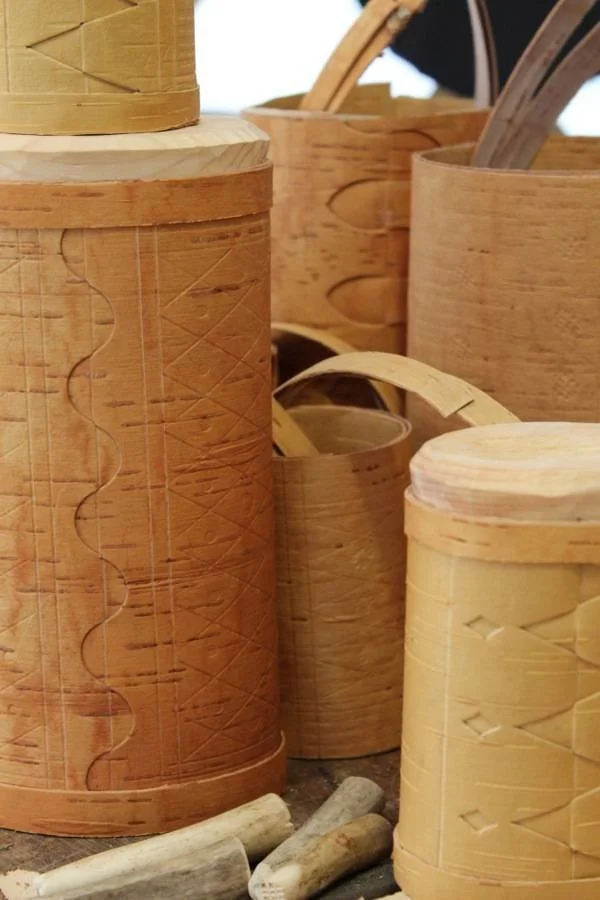
boxes at various stages

start with bark that is no thicker than 1/8"-make a rectangle with a straight edge

use something to make a square to edge line 1 1/2" in from ends

find half way point roughly and make mark

use gouge- splitting half way mark with the gouge

cut bark by pushing or mallet, all marks are equal distant- full gouge apart

once on side is cleared with a knife or straight chisel line it up with the mark on the other end and mark edges of holes

cut other holes

skive edge

cut withing the hole leaving a little tap on each side..kinda like an arrowhead

should be like this on only one end

these tabs fit into the holes on the other end

pull tight to seat the tabs

inside view

clean up a piece for the inside

the inside piece is just overlapped. outside of bark to outside of bark

squeeze into oval shape and trace

create an X and Y axis on the oval
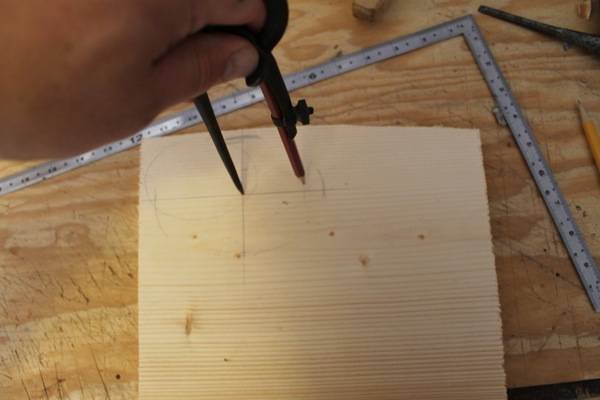
transfer the narrow width to the length axis on both sides

put in some nails and tie a string to these three points

take out the width nail and replace with pencil. follow the string around it will make a perfect oval.

the base should be 1/8 or so bigger and forced in place, then pegged.

lid has a tapered edge about 6-7 degrees

cutting the bands with the mortise first

stretch it around the box and make it a little smaller

cut the opposite sides off

feed one end into the other and twist. stretch onto box like a rubber band. one for the top one for the bottom.
finished boxes